The vista is breathtaking; your friends line up for a group shot; you take the photo. When it comes time to edit your photos at home, you realize that you are noticeably absent from a majority of your shots. dSLR owners know this feeling all too well, thus, the Smart Trigger was created.
Smart Trigger from Satechi aims to solve the dilemma of shoot or be shot while offering a variety of other unique features. The Smart Trigger is essentially two devices in one: a wireless trigger and an intervalometer. The device works on a plethora of Canon cameras, even the non-dSLR Powershot G10 and G11 are supported. Strangely enough, Satechi decided to throw in support for the Pentax K7 dSLR, the only non-Canon device on their list. The Smart Trigger device requires a companion app in order to control and operate the unit. The app can only be installed on select bluetooth 4.0 devices; that includes Apple’s iOS devices, Samsung Galaxy S3, S4 or Note 2 devices and it can be found in the Apple App Store and Google Play, free of charge. For this review, I will be using an iPhone 5 and a Canon 5D Mark II.
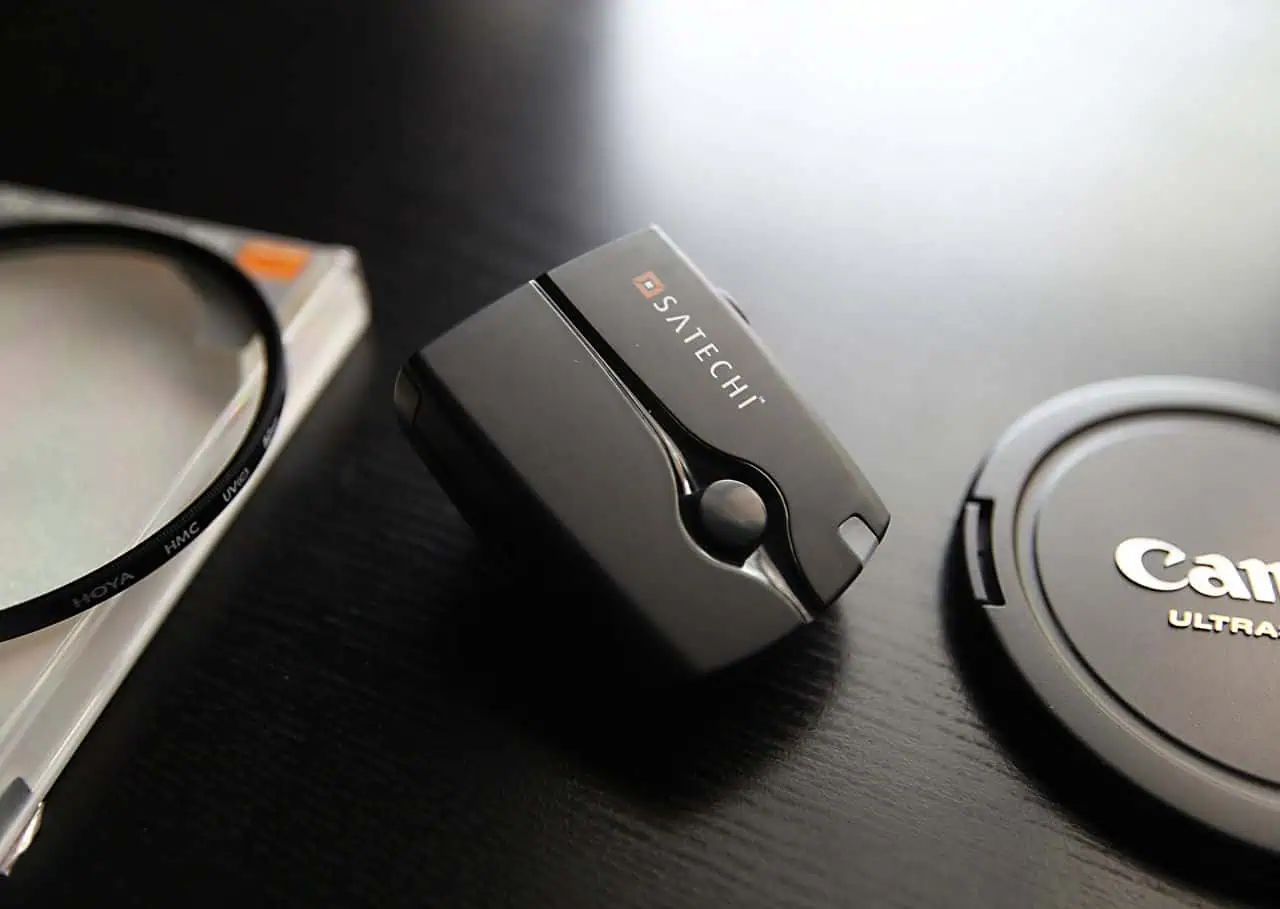
The Smart Trigger Dongle
The device works by mounting it onto the hot shoe of your camera. It would then need to be tethered to your camera using the provided cable — the stereo end plugs into the dongle, whereas the other end connects onto your camera’s remote shutter port. The unit has no metal contacts on the bottom, so there is really no need for it to dock on your camera’s hot shoe, but for the sake of it not hanging off your camera, it is best that the unit be mounted. The Smart Trigger dongle is also powered by two AAA batteries — thankfully, Satechi decided to provide two Duracell batteries in the box. Upon taking it out of its packaging, you will find that the unit is simplistic in its design, having only a fret accent across the center and one LED on the top. The unit is quite small and definitely pocketable, if your camera bag is scarce on storage space. The unit is made of plastic and does feel quite cheap, luckily, the unit is well assembled and the chassis will not bend under pressure. My only complaint, however, is that the battery door feels very flimsy. Upon lifting it, the battery door can be twisted left and right, and it feels loosely held together. The left side of the unit has one 2.5mm jack for the cable input; that is all the ports on the device. The device only has one button, and it sits at the top. The button serves to connect your iOS/android device to the Smart Trigger via Bluetooth. The LED on the device blinks red at certain intervals and works in tandem with the multifunctional button on the unit. According to the manual, holding the button down for one second will reconnect an prior paired device, the LED will blink once. Holding it down for two to three seconds will put the device into sleep mode and the LED will blink slowly. Lastly, holding it down for four seconds will put the device into Bluetooth pairing mode; the LED will blink rapidly.
The Smart Trigger App
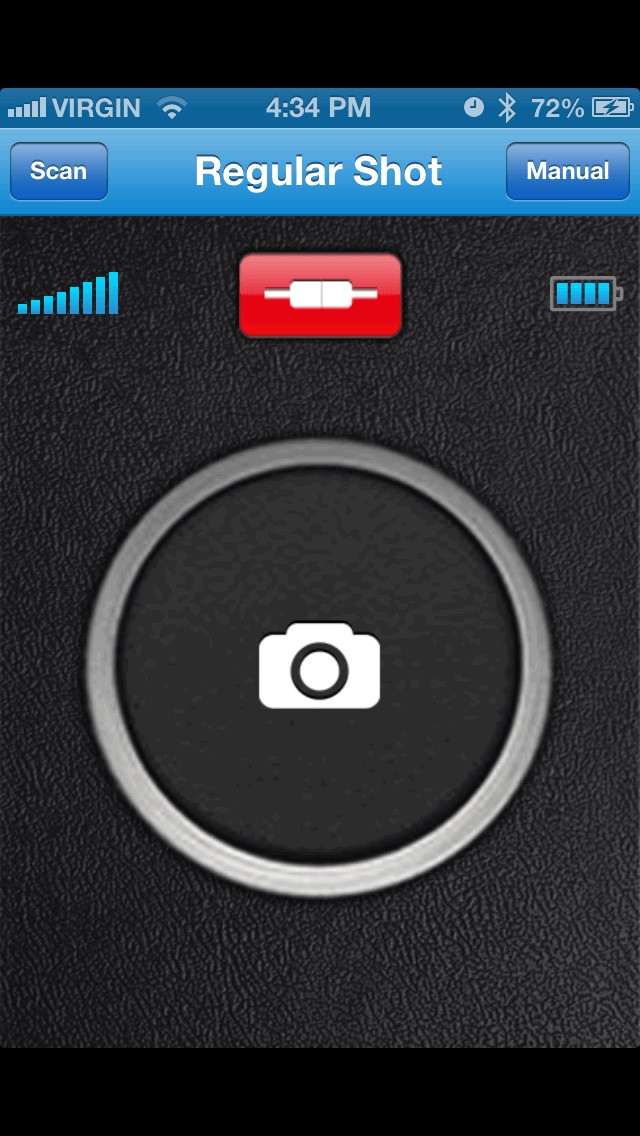
The app is divided into five main sections: scan, regular, manual, timed and support. Scan does what its name suggests: it scans for the Smart Trigger device and pairs with it via Bluetooth. Be aware that the app does not launch into the scan screen upon startup. I had a little difficulty pairing my phone with the device for the very first time, but after several attempts, I was able to connect my two devices.
Regular Shot mode is essentially just an extended shutter release button. ‘Regular Shot’ is fairly simple in terms of design: it has one very large button at the centre. The button was designed large on purpose as it was meant for shooting discretely during group shots or a self portrait. Because the Smart Trigger operates with Bluetooth, your mobile device of choice does not need to be pointed directly at the Smart Trigger to work. Now when group shots are taken, your device can be hidden and still operate, eliminating shots where the photographer sticks out like a sore thumb pointing at the camera. Regular mode works just like pressing the shutter button on your camera. For any setting you have made on your camera, ‘Regular Shot’ will shoot by those settings. It also works for bulb mode and continuous burst. Even though there is no focus button, pressing the large button activates the camera’s focus before it takes the shot, ensuring your shot is perfectly focused.
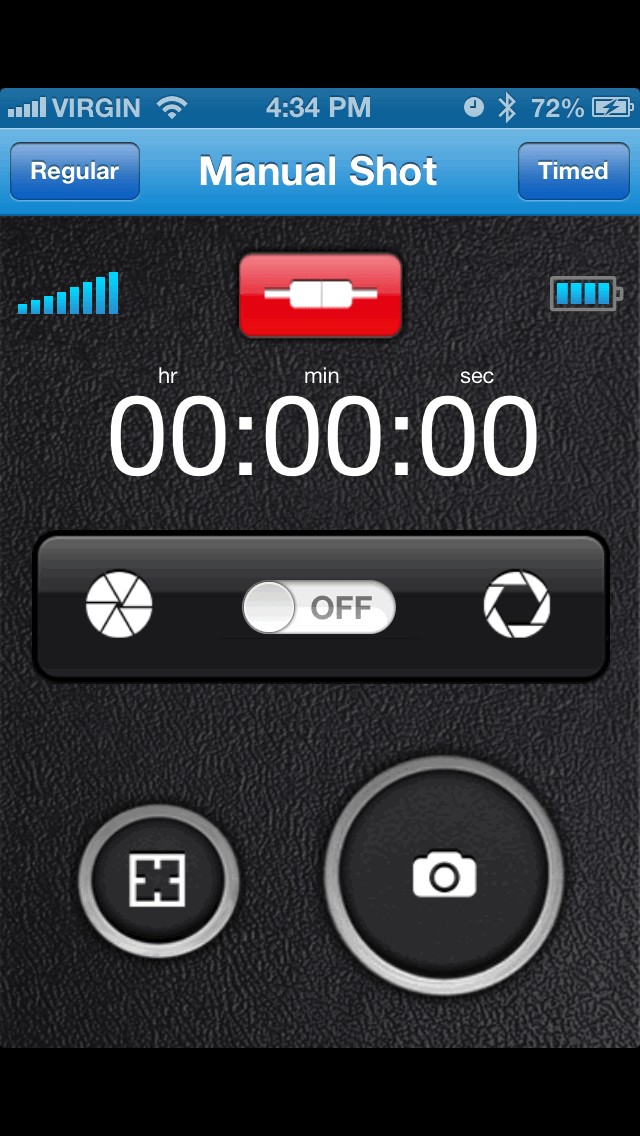
Manual Shot mode is something of an oddity, do not let its name fool you, as it is not the manual that we know and love from our dSLR’s. Unfortunately, you will have to adjust your shutter speed, aperture and ISO on your camera as this mode will not allow you to adjust your exposure settings like the manual mode on your camera. Instead, ‘Manual Shot’ mode on the app is meant to work in conjunction to your camera’s bulb mode. The main purpose of ‘Manual Shot’ is to keep your shutter open for long exposures. This mode is quite useful for night photography because it allows you to surpass the thirty second limit imposed by the camera and allows the shutter to remain open longer. There is also the option to use an on/off switch to allow the app to hold the shutter open instead of holding the trigger button manually. With the switch turned on, the shutter will remain open indefinitely until the switch is turned off. Manual also comes with a timer depicting the hours, minutes and seconds of how long your exposure has taken place; it will reset itself upon releasing the shutter. There is also a separate focus button included. Unlike ‘Regular Shot,’ ‘Manual Shot’ will open the shutter without focusing, it will be up to the photographer to focus prior to shooting.
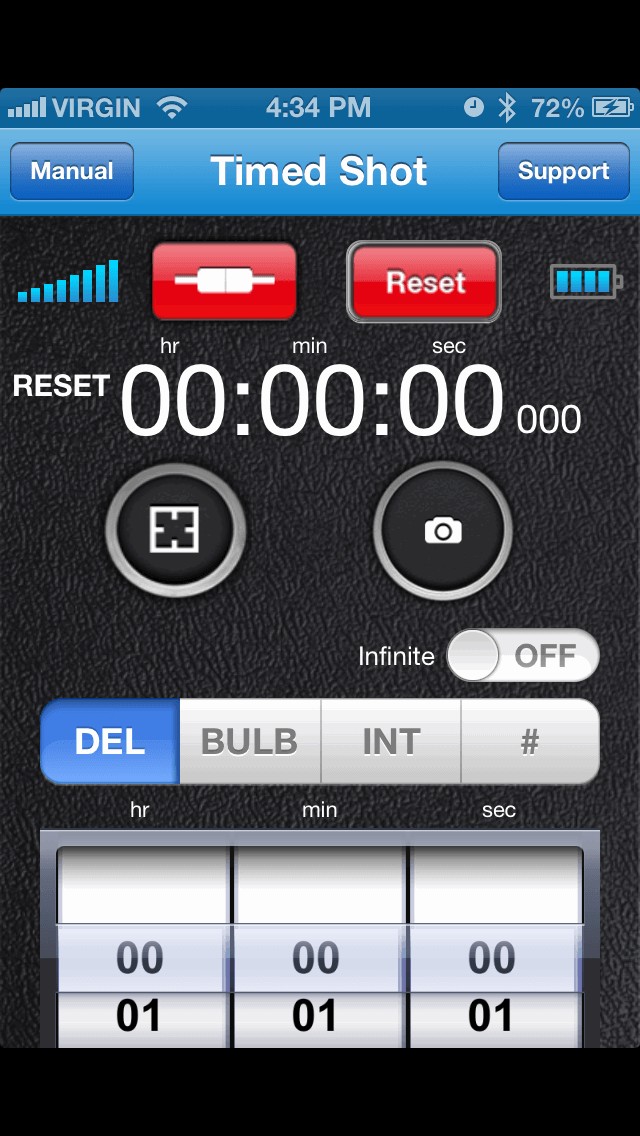
Timed Shot mode is an interesting one — essentially, this part of the app works as an intervalometer. ‘Timed Shot’ enables the camera to perform techniques that is otherwise impossible without the Smart Trigger device — the most prominent being time-lapses. ‘Timed Shot’ has four main toggles at the bottom: Del, Bulb, Int and #. ‘Del’ is short for delay. What delay does is it controls the amount of time it takes before it releases the shutter — it is essentially a countdown, similar to a dSLR’s timed shot. ‘Bulb’ is what the name suggest, it controls how long the shutter will remain open. ‘Int’ is short for interval and it controls the amount of time it will take to continue to the next delay countdown — think of interval as a break between shots. ‘#’ is the last toggle. The ‘#’ setting controls the quantity of shots. Of course, if you want to shoot indefinitely, there is a switch just above the ‘#’ button labeled ‘Infinite’ that allows you to shoot forever, at least, until your battery is depleted. All four toggles can be finely adjusted with a scroll wheel at the bottom. With the exception of the ‘#’ setting, the other three are capable of adjusting their hours, minutes and seconds individually. All three settings have the ability to go to a maximum of 99 on the scroll wheel. So if you have a lot of free time on your hands, you can do delays, exposures and intervals for up to 99 hours, 99 minutes and 99 seconds a setting; just be sure to take with you a lot of camera and AAA batteries if you are feeling daring. The ‘#’ setting also has access to the same scroll wheel, although instead of hours, minutes and seconds, you have access to quantity in the form of 100, 10 and 1 (hundredths, tenths, and ones). Each scroll wheel is limited to the maximum number of 9, allowing you to shoot to a maximum of 999 shots total. Timed Shot mode also has a handy timer at the top depicting the hours, minutes and seconds. The timer also displays the current setting on the left side of it, letting the user know which phase of the countdown they are in from delay, bulb, interval and paused. Timed Shot also features a reset button at the top in the event the user would like to start anew: eliminating the need to scroll the dial back to the top.
The signal bar and battery icon are prevalent on all modes, although they do not have any particular function other than letting the user know that they are connected and the Smart Trigger has batteries in it. The signals do not update regardless of your proximity, and the battery bar will always show that it is full. The signal bar is a curious design choice as it serves the same basic function as the red plug icon next to it; in essence, the app has two connection indicators. Satechi claims that the Smart Trigger will work within 50 feet, although that claim is true for outdoors, I was only able to achieve 42 feet indoors. Regardless, the signal bars will not work in real-time nor show the true signal strength: it will cut off without warning if you wane too far.
Small Hiccups
Although the Smart Trigger app is handy, it does have its flaws as well. The app is very poorly designed in an aesthetic sense, the layout is haphazard and the design choice is questionable. I was dismayed upon launching the app because it was letter-boxed: indicating it was designed for iOS devices with 3.5 inch screens. It was a little duplicitous because Satechi decided to use an iPhone 5 (4 inch screen) on their packaging, but it is not a deal breaker and the app works just fine without it being full screen.
Launching the app for the first time, you will be greeted to the ‘Regular Shot’ screen and not the ‘Scan’ screen. You will have to switch over to the ‘Scan’ screen to start the Bluetooth tethering with the Smart Trigger device; this is where my troubles began. I had one failed attempt after another by following the manual in verbatim. It was suggested that by holding down the button on the Smart Trigger device for 4 seconds, it would pair the device to my mobile phone. It was in my experience that the button needed to be held down for at least 6 seconds in order for my iPhone to register the Smart Trigger. Not pairing with the Smart Trigger for a prolonged period raised an issue where it will forget my iPhone completely. Pairing it for the second time is not a smooth process either. I had to delete the ‘tag’ of the previous pairing from the app and in my iPhone’s bluetooth settings in order to make a new pairing.
The app’s aesthetic design is a conflicted mess. Satechi cannot decide whether they want to go with a their own design or use iOS’ standard graphics, so they used both. A low-resolution faux leather background is prevalent on all screens and it feels very unpolished, lazy even. The shutter and focus buttons is another attempt at their own design, but they are also subject to being low-resolution and look even worse when blown up on the ‘Regular Shot’ screen. Layout is another issue as the graphics and typography seems to lack any sort of grid system. The biggest culprit is the ‘Timed Shot’ screen where objects are cluttered and text just do not seem thoughtfully laid out.
The menu bar system is also has its quirks. Not only does the bright blue look terrible against the black leather background, but it is also a hassle to use. It uses a forward and back system to navigate between modes, and because there are five different screens, this becomes a tedious over time. It get’s worse when the ‘Scan’ screen has a back button that does not go back, but progresses forward onto the next screen. The ‘FAQ’ button on the very last screen loads up Satechi’s website — very slowly if I may add. Upon loading, it does not even show you any frequently asked questions. Their website simply shows you two youtube videos with their thumbnails cut off the screen — just make sure you have data if you need any help. You are better off with taking the included paper manual with you require assistance.
I did find a serious bug that needs to be corrected. When in ‘Timed Shot’ in the ‘#’ setting. Leaving all the quantity scrollers at ’00’ and having the ‘Infinite’ toggle switched to on, the camera will keep shooting indefinitely. Even when I turn off Bluetooth on my phone, the camera will keep on shooting. I even tried shutting down the app and that will not work either. I also tried disconnecting the cable, only to find that it will continue shooting upon re-attaching. Turning off the camera will not help either as turning the camera back on will continue the shooting process. The only solution to stopping it is to remove the batteries from the device, or to hold the power button for 3 seconds to power it down.
Wrap Up
With continuous usage, my iPhone 5 was losing an average 9% an hour. My iPhone was at full charge before I conducted the test, and it was set at a quarter brightness, cellular 3G, no wifi and no running apps other than the Smart Trigger app. My camera on the other hand, started with a fully charged (and fairly new) OEM battery, I was down to 80% in one hour, which is fairly standard considering I was able to take in over 400 shots in an hour. Overall, the Smart Trigger does have some quirks, and the app feels tacked together, but for its relatively modest price, you get a decent amount of features that opens up a range of options that was not made available before. If you love to be included in shots from time to time, love to light paint, do time-lapses or long exposures, flaws aside, the Satechi Smart Trigger does the job.
Buy It: $44.99


Really nifty idea, but a bit shit that it predominantly only works with Canon cameras, surely Sony and Panasonic should be have been compatible too?